Tampilkan postingan dengan label hardwood floors. Tampilkan semua postingan

first look at my (still in progress) kitchen

Posted by sew4tejhtr6ier Kamis, 16 Mei 2013 0 komentar
welcome to my new house!
there is still a staggering amount of work that needs to happen, but i am SO happy to be in the house, and i know that each little project will only add to the feeling of "home" that i already have here.

a few things that still need to happen in the kitchen + dining room:
*get a range! that is a big one. we are still hunting for one that meets our needs and fits our budget. i have (surprisingly) been getting along just fine without it so far! i have been amazed at how many meals can be prepared between a crock pot, the george foreman grill, an electric skillet and the microwave! it also helps that summer is almost here, so we are eating more salads and sandwiches.

*install the trim kit around the fridge and freezer. we thought we could just pop this on, but found out that we have to lay the units on their backs! yikes. this is going to require the help  of several "lucky" neighbors/friends to pull off!

*install a back splash. i have some options, but frankly, this is pretty low on my priority list compared with the other things we need to get done.

*get paint touch ups to the cabinets.

*get two pendants for the island and a chandelier for the the dining room. i think i know what i want in both spaces, i just need to save the $$ for them.

*get an additional shelf made for the open dish area.

*add window treatments for the dining room

*get a larger table. i have had this one (and have LOVED it) for the last 13 1/2 years. it is from pottery barn, and has a stainless steel top and it still looks amazing. it is just a little too small for the 5 of us. i love it so much that i think i will have a larger stainless steel top made for this base. the chairs also need some sprucing up.

*install shoe mold, wall trim and crown molding.

*stain the exterior door.

* get hardware for the doors.

*hang artwork. the pictures on the hood are temporary. i just wanted to see how they would look...

yep.
still a lot to get done, but i am thrilled with everything so far!

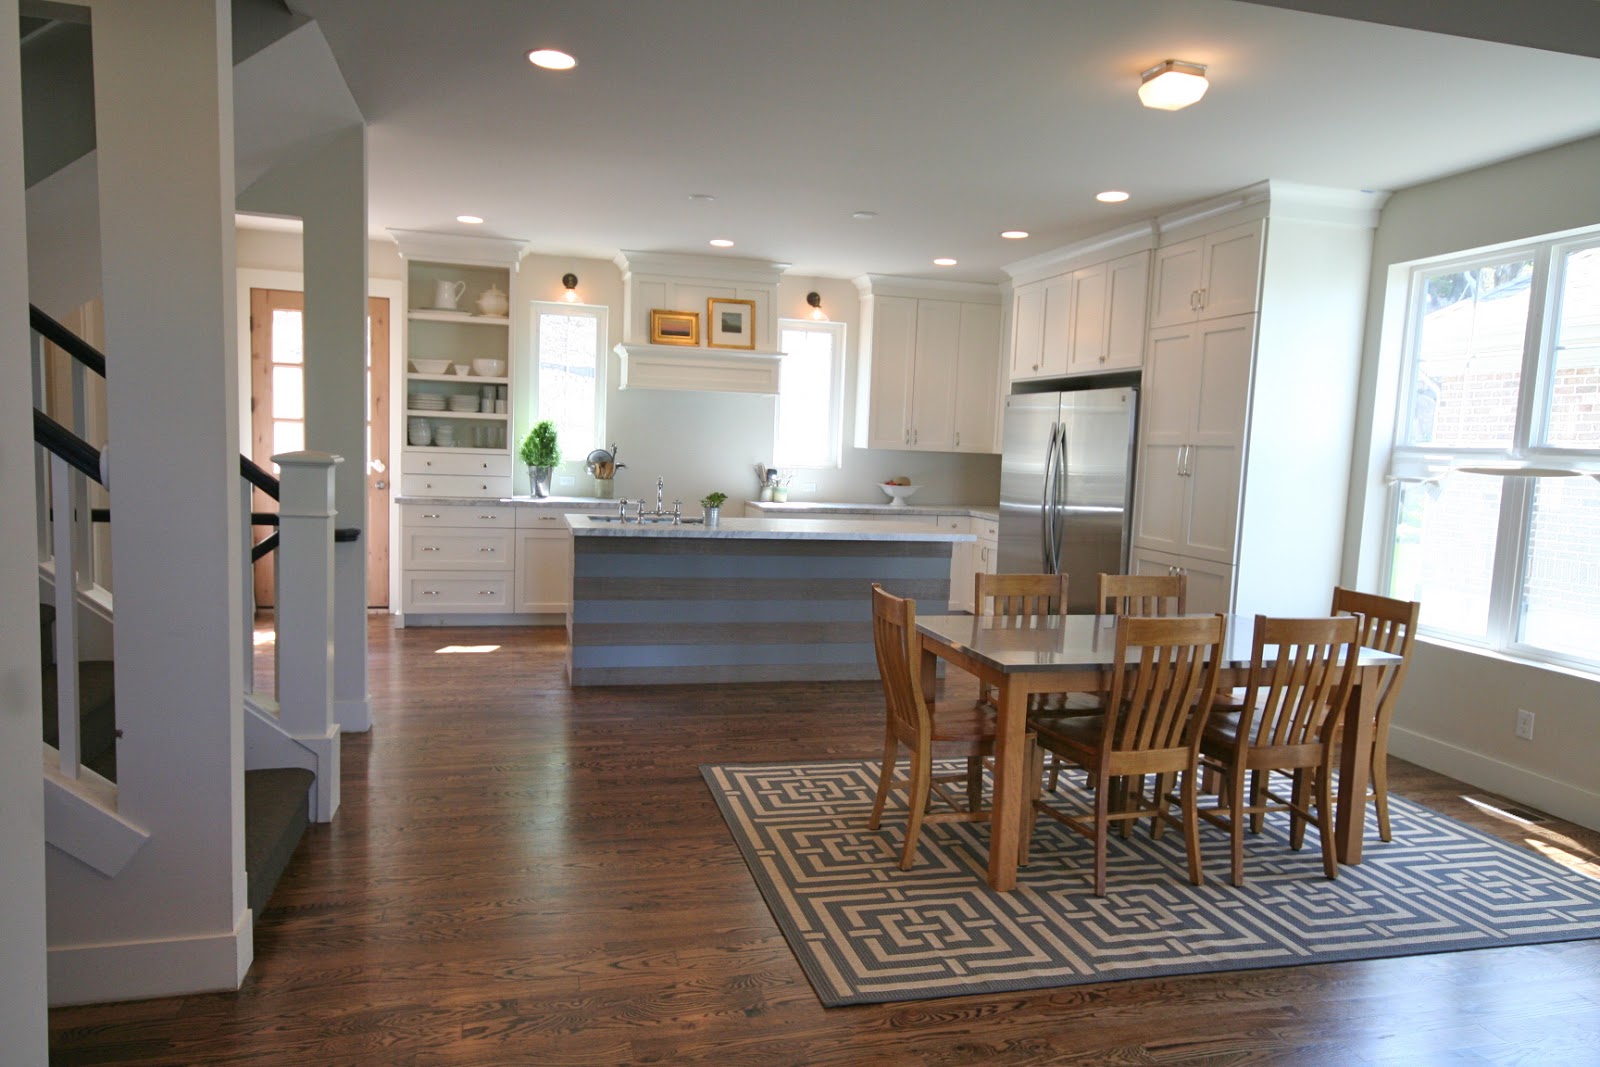
another look at the **finally clean striped island!


and yes---that little button by the faucet is for the garbage disposal! if y'all want more information on this, i will write a separate post with all the details.

in this picture, you can get a little peek into the office nook.
right now it is a dumping ground for everything that i don't want in the kitchen.

we went ahead and put carpet on the stairs. the list of things TO DO were adding up, and we figured that it would be a while before we got to painting them and making them look nice, so we just had the carpet guys come back and lay carpet on the last few steps.

the small hallway to the left of the stairs leads to the powder room and master bedroom.
i have some big plans for the entry!
i just haven't quite decided on exactly what i want...for sure some trim. i may even duplicate the trim of the dining room in house #5.
i think i would also like to add some wallpaper somewhere...maybe on the ceiling?


for now, i placed this little console and plopped up a few things on it to make it feel a little more pulled together. i would love to have a custom made floating console made for this wall, but first...
a range and some doorknobs! priorities!

and, just to make you feel better---see? there are still tubs and boxes on the great room floor, furniture wrapped in plastic and nothing on the walls!
the room gets a lot of light though! that is something that everyone who walks in comments on. since it is essentially one big room, there are windows on 3 sides of the space, which really brings the light in.

hopefully, after i unpack a few more boxes, i will post some pictures of the other rooms of the main floor and the upstairs!


Baca Selengkapnya ....

a (very) basic lesson on installing hardwood floors

Posted by sew4tejhtr6ier Kamis, 09 Mei 2013 0 komentar
you know how right after something traumatic happens, you don't want to talk about it for a while?
like talking about it almost brings back all of the pain and aguish?
that's a little bit how i feel about installing hardwood floors!
(i am kinda joking about that, and kinda NOT joking at the same time!)
i also happen to feel that way about moving!

anyway, i just wanted to give y'all a very breief intrciduction to how my husband and i spent about 300 hours of our lives:
i wouldn't use this as a guide on exactly how to install hardwood floors, but it will defeintely give you an idea of what you are getting yourself into if you decide to tackle this yourself!
for best results, a 15 pound felt underlayment should be laid down on top of the subfloor, which acts as a vapor barrier. (that's the black stuff you see! it comes in a big roll and is available at any home improvement store.)

be sure that the floor is swept and free of debris before the felt is laid down. any lumps or bumps could create uneven spots in the floor.


we stapled down about half of the felt, but ultimately found that NOT stapling it down worked the best to reduce wrinkling and bubbles.


hardwood comes in bundles, like you see here. the woods needs to be acclimated to the space where it will be installed because it is sensitive to moisture levels and temperature and will expand and contract. bringing it inside a few days before it will be laid will allow it to "get used" to the air in your house.

bring over at least 2 bundles of wood close to where you will be laying out the floor.
mixing two bundles will ensure an even distribution of lengths, color and grain.
we laid red oak #2, which means that the wood has some "flaws" like wormholes and knots. we actually love the "flaws", and feel like it gives a floor more character. there are also on occasion, boards that cant be used due to missing tongues or grooves, or really large knots and imperfections. we found that, on average, about 10% of the boards were "undesirable" or unusable.
(red oak #1 is a more "even" product--less variation, fewer worm holes and knots. it also costs more that #2.)

carefully cut the plastic straps that hold the bundles together. it is best to cut on the underside of the wood, so you don't score the face of the planks with your utility knife. (the underside of the wood has grooves on it that allow for air movement and help the wood to lay flat on an uneven surface. the top surface is flat.)

next, you "rack" the wood, which means you lay it out on the floor exactly the way in which it will be nailed down.


a few things to consider:
make sure the joints are not too close together. a good rule is at least 2.5 widths of wood between each seam. this will ensure a stronger floor.


make sure that each plank fits together nicely. sometimes they are milled wrong or are missing a tongue or groove.
we found that the work went faster when the "racker" was 4-8 rows ahead of the "nailer".

leave enough space in between where you are racking and where the wood is being nailed in place so that there is room for the nailer to hammer in the staples.
at the end of each row, there will almost always need to be a cut made.

for this project, we used a table saw (for long narrow rips along walls), a chop saw (for end cuts), and a jig saw (for cuts around heat registers and door casings).

each plank gets tapped into place with a rubber mallet. sometimes they go in smoothly, but other times they need some serious whacking.

once the plank is in place, the rubber mallet is used to drive the nail or staple in place. we used staples,
and drove them in about every 6". even though the nail gun is pneumatic, it still takes a pretty hefty swing of the mallet to drive the staple in! translation: it is hard work and will make you sweat a lot.


the staple should fit nicely, right at the top of the tongue. see how you can barely see the staple? that's what you want!

sometimes, the staple splits the wood or doesn't go in properly.
if that is the case, it must be removed with with a hammer and chisel, and the entire area cleaned of wood chips and debris.
loads of fun. 
(can you hear the sarcasm dripping off that comment? i hope so. that part was the WORST.)

as you move along, the area where you will be laying the wood needs to be cleaned to ensure that everything lays perfectly flat.

once you get close to a wall, the staple gun cant be used becuase there is not enough room to swing the hammer. a nail gun must be used instead.

of course, laying the wood is just the  beginning of the process...

 but the hard work...

 is definitely worth it in the end!

have a great thursday everyone!


Baca Selengkapnya ....

construction progress: week 26

Posted by sew4tejhtr6ier Selasa, 07 Mei 2013 0 komentar
sorry for not posting last week...things were down to the wire and i was a VERY busy lady trying to pack up my rental house and get it cleaned. not to mention the fact that we MOVED!!
yes, indeed we did.
honestly, i don't know of many things that can wear a person out like moving!
(it. is. the. WORST! seriously---this is the 13th time allen and i have moved and i swear it never gets easier.)
anyway, we are finally IN our new house and i cannot wait until the boxes are cleared enough to share some pictures!
but first, here are the miracles that happened in the last week of construction:

we finally installed the floors in the powder room and office nook.

we went with option B. (the cheaper and easier option. that seemed to always be the theme as we got closer to the end!)


our original plan was to lay a checkerboard floor in the powder room and herringbone in the office, but it all came down to time. (we ran out.) so, hopefully sometime in the future i can stencil the floors.
i was just glad to see the floors DONE. installing hardwood is not easy. (more on that in another post this week!)


one last look at the finally clean main floor


the hardwood floors were sanded...

(we were planning on finishing the floors ourselves up until a few days before the floors HAD to get finished, but as luck would have it, we were able to find someone to do it for us and still stay on budget!)

after the first round of sanding, a coat of filler was applied...


 this helps to fill in any gaps, holes or knots.


then, the floors were sanded again, vacuumed, and the first coat of stain went on.

as you MIGHT be able to tell from the pictures, we opted to go with minwax dark walnut!
i loved all of the votes, and i was surprised to find that the were just about split evenly between dark walnut and provincial. we decided we wanted something a little bit different than what we have done in the past, so we chose dark walnut. i am SUPER happy with it! it is still very warm, and not so dark that you can "see" everything.

 meanwhile, OUTSIDE....
 more grading was done in the back yard, front yard and driveway.

 the front/side retaining wall was completed and the front yard was back filled around the wall and leveled.

 gravel was brought in to prepare the driveway concrete getting poured.

the sidewalks were also prepped for concrete.


the gravel had to be raked and leveled.

 there always seemed to be 3 pieces of heavy machinery and at least 2 trucks parked in front of the house the entire week!

the forms for the sidewalk and driveway were set.


and my husband designed the front steps to cantilever out so that when the forms are off, there will be space to lay stone under the concrete, which will help the steps to tie into the house and give the entry a more formal look.

back on the inside....
 after two coats of stain, two coats of polyurethane were applied.
don't freak out....the floors wont always be this shiny!

 at this point, the floors couldn't be walked on for 30+ hours, so we were crawling into the basement
through a window and walking up the stairs to get a look at the floors!

isn't it pretty??
it smelled terrible...the fumes were enough to knock you over, but it sure looked good!

 this is a look at the floors after they finished curing! 


 and another peek, taken through the garage door hole.

 FINALLY, on the outside....
 a monster concrete truck and a huge crew poured the sidewalks and driveway. this was taken at about 8:30 in the morning...the activity in front of my house was absolutely insane!

 first, the concrete was dumped...

 and then smoothed. it was pretty mesmerizing to watch!


a couple hours later, they were all done!
the concrete had to cure for a few days before we could drive on it, which presented a little bit of a challenge when it came to moving! we had to park the truck on the street, and everything had to be carried into the house. (we did manage to bring a load of some larger stuff before the concrete was poured, which was great.)

a look at the finished retaining wall and back yard.
 

 we also had to put in some irrigation pipes...

a look at the finished sidewalks...

 and the front steps.
 the forms on the front steps actually have to stay on for over a week, so the stone under them will be laid in the next week or so.


the front of the island.

things really started feeling "real" when the appliances showed up!


we chose separate freezer and fridge units and i couldn't be happier!
i am thinking of writing a post on the fridge/freezer....maybe later this week.

anyway, the plumbers came back an installed the powder room and hooked up all the plumbing fixtures. having running water in the house was SO nice! not to mention the fact that we don't have to
use the port-a-john that has been camped out on our sidewalk for 6 months any more!
thank goodness.

more work was done on the stone veneer for the front retaining wall...

oh.
and then we MOVED.
here i am, taking a break from cleaning and packing at the rental house.
it took 3x longer to pack than i anticipated and at least 4 x longer to clean.
i am SO glad it is OVER.

i really wanted to get to the new house and take some nice pictures of the inside, but the two days before we moved were completely CRAZY. there was not a minute during those days when i wasn't running around packing or cleaning. i also wanted to have an open house so people could walk through, but we just ran out of time.

things are still a little hectic. there are quite a few things that are not done...
for instance, we don't have a stove/range, so cooking is a little interesting. we also don't
have our closets installed or door hardware, but i would rather be camping out here
missing a few things than anywhere else in the world!

stay tuned for more updates!


Baca Selengkapnya ....
Trik SEO Terbaru support Online Shop Baju Wanita - Original design by Bamz | Copyright of wallpaper borders.